
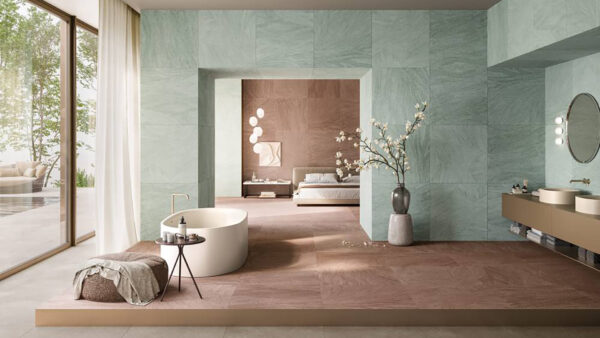
You may have seen it in a magazine, in a newly renovated home, or scrolling through interiors on Instagram: a bathroom where the walls, floor, and shower all flow seamlessly into each other in a single material, creating a room that feels calm, complete, and genuinely expensive. That is tile drenching, and it is one of the most talked-about bathroom design techniques in the UK right now.
The good news is that it is also one of the most achievable. You do not need a limitless budget or a bathroom the size of a hotel suite. You need the right tile, the right grout, and the right plan. This guide walks you through everything, step by step.
What Is It
What is tile drenching?
Tile drenching means using the same tile, or closely related tiles in the same tone and material, continuously across all surfaces of a bathroom: floors, walls, and sometimes the ceiling. Rather than treating each surface as a separate decision, you treat the entire room as a single, unified envelope.
The term borrows from colour drenching, the paint trend that involves saturating a room in a single shade from skirting board to ceiling. Applied to tiles, the effect is arguably even more powerful because you gain not just colour continuity but material continuity: the same texture, the same finish, the same grout tone everywhere you look.
Done well, a tile-drenched bathroom feels like stepping into a room carved from a single piece of stone. It is immersive, deeply calm, and consistently one of the most admired results our customers show us when they come back to share their completed projects.
Think of a tile-drenched bathroom not as a room covered in tiles, but as a room lined in a single material. That shift in mindset changes everything about the outcome.
Why It Works
Why tile drenching makes bathrooms look better
Before diving into how to do it, it helps to understand why it works so reliably:
- It removes visual noise. A standard bathroom has multiple surfaces competing for attention: a different tile on the floor, another on the walls, paint above the dado, perhaps a third tile in the shower. The eye jumps between them. A drenched bathroom removes all that competition. There is one material. The eye settles immediately.
- It makes any room feel larger. Continuous material across floor and walls blurs the boundary between the two, making the space feel more expansive. This is especially valuable in small bathrooms and en-suites.
- Fewer grout lines read as more expensive. Large format tiles used across all surfaces naturally produce fewer joints, and that reduced grid has a strong association with high-end, considered design.
- It is harder to get wrong. When everything shares the same material family, there are no mismatched tile choices to worry about. The palette decisions are made once and the rest follows naturally.
The How-To
How to tile drench your bathroom: step by step
-
1
Choose your anchor tile carefully
This tile will cover every surface you look at, so it needs to be beautiful at scale and easy to live with. The best choices for tile drenching are large format tiles (600x1200mm or larger) in natural stone effects: travertine, limestone, marble, or sandstone in warm, matte finishes and neutral tones. Avoid anything with a very busy pattern or a very distinctive veining that will repeat noticeably across large areas.
-
2
Use a floor variation rather than the identical tile
You do not need to use the exact same tile on every surface. The best tile-drenched bathrooms often use a closely related tile on the floor: the same stone effect and tone but in a matte textured finish with an R10 or R11 slip rating. The slight material difference adds subtle depth while keeping the drenched effect completely intact. This also means you get the right safety rating on the floor without compromising on the overall look.
-
3
Match your grout to the tile
This is the most important practical decision in tile drenching. Choose a grout colour as close to your tile as possible. Even a slightly contrasting grout will create a visible grid across every surface and immediately undermine the seamless effect you are working towards. Most grout manufacturers offer colour-matching services. If in doubt, go one shade slightly darker than the tile rather than lighter: a marginally darker grout reads as intentional, while a lighter grout creates a stark grid.
-
4
Keep fixtures and fittings simple and consistent
A drenched room needs clean, unfussy hardware. Choose one metal finish and use it throughout: brushed brass, matte black, brushed steel, or brushed nickel all work well. Avoid ornate or decorative fixtures that introduce too much visual contrast against the calm, continuous tiled surfaces.
-
5
Add texture in one defined area
A single-material room risks feeling flat if there is no variation in surface quality. A fluted tile in a niche, a ribbed mosaic on the shower floor, or a textured feature panel in the same tone introduces tactile interest without breaking the drenched palette. This is the detail that separates a considered tile-drenched bathroom from a monotonous one.
-
6
Decide what to do with the ceiling
In a shower enclosure, taking tiles up to and across the ceiling creates the most immersive, wet-room-style effect. Outside the shower, a painted ceiling in a closely matched warm neutral often works better than tiling it fully, as it lifts the space slightly and prevents the room feeling heavy. A warm white or very lightly tinted finish that echoes the tile tone reads as a natural continuation of the drenched palette without the additional cost and complexity of ceiling tiling.
Always order at least 15% more tile than your measured area when tile drenching. You are covering significantly more surface area than in a standard bathroom layout, and having tiles from the same production batch for any future repairs is essential for maintaining the seamless look over time.
Is It Right for You?
The honest pros and things to plan for
Tile drenching is one of the best techniques available in bathroom design, but it is worth going in with clear expectations:
Why it works so well
- Makes any size bathroom feel larger
- Creates a genuinely high-end, designed result
- Removes the risk of mismatched tiles
- Fewer grout lines means easier cleaning
- Timeless: not a look that will date quickly
- Works in small en-suites and large family bathrooms equally well
Plan carefully for these
- Tile choice matters more: it covers everything, so getting it right is worth taking time over
- Large format tiles need a skilled installer and a perfectly flat substrate
- Grout colour matching requires thought before you order
- Very dark tones need excellent lighting to avoid the room feeling heavy
- Order extra from the same batch: repairs later depend on it
Three Approaches
How to tile drench: three styles to consider
Tile drenching is not a single look. Here are three distinct approaches, each suited to a different bathroom aesthetic:
-
The spa hotel
Warm travertine or limestone-effect porcelain across floors and all walls. Minimal grout lines. Brushed brass fixtures. This is the gold standard of tile drenching and the look most associated with high-end hotel bathrooms. It works in any size room and feels both contemporary and timeless.
Best tile: Large format travertine-effect porcelain, honed matte, 600x1200mm or larger -
The quiet modern
Cool greige or warm white large-format porcelain, floor-to-ceiling. Seamless. Matte black fixtures. Very clean and contemporary without the warmth of travertine. Works particularly well in a modern new-build or a sleek en-suite where the proportions of the room do the heavy lifting.
Best tile: 600x1200mm concrete or stone-effect porcelain in a neutral warm white or greige -
The character drench
Zellige or handmade-effect tiles in sage, teal, or warm terracotta, used across walls and floor. Smaller format, more texture, more personality. Especially effective in a small cloakroom or shower room where the scale of the space suits a smaller tile. The natural variation in handmade tiles prevents the drenched look from feeling flat or clinical.
Best tile: Zellige-style or glazed handmade-effect ceramic in a single rich tone
Common Questions
Tile drenching: questions we hear most often
Does tile drenching work in a small bathroom?
It works particularly well in small bathrooms. Continuous material across floor and walls removes the visual boundary between the two surfaces, making the space feel significantly larger and more cohesive. A small en-suite tiled floor-to-ceiling in a single warm stone-effect will feel noticeably bigger and calmer than the same room with different tiles on each surface.
Do I have to use the exact same tile on the floor and walls?
No. The principle is tonal continuity, not necessarily identical tiles. Using a matte textured version of your wall tile on the floor, or a smaller format tile in the same tone for a shower niche, maintains the drenched feel while introducing practical variation. What matters is that every surface reads as part of the same material family.
What grout colour should I use?
Choose a grout as close to your tile colour as possible. If you cannot find an exact match, go one shade slightly darker than the tile rather than lighter. Take a tile sample with you when choosing grout, or ask our team in the showroom for a recommendation. Getting this right before you order is much easier than trying to change it afterwards.
Can I tile drench with a patterned tile?
Yes, though it requires more confidence. Bold patterned tiles work best in smaller areas, such as a cloakroom or compact shower room rather than a large family bathroom. If you want to use a patterned tile across all surfaces, make sure the pattern is subtle enough that the repeat does not become overwhelming when viewed at scale.
Will it look dated in a few years?
Not if you choose your tile carefully. The look of material continuity and enclosure is deeply rooted in how humans experience comfortable, sheltered spaces. It predates any contemporary trend and will outlast it. A warm stone-effect travertine tile used floor-to-ceiling in a honed matte finish will look just as considered in 2036 as it does today. The tiles that date quickly are those chasing a very specific colour moment or a highly stylised pattern tied to a particular year.
How much more tile do I need to order?
Allow 15% above your measured area. You are covering more surface than in a standard bathroom layout, cuts and waste add up, and having spare tiles from the same production batch matters enormously for any future repairs. Our team in the Exeter showroom can help you calculate exactly how much you need before you order.
Come and see tile drenching in person
Our Exeter showroom has full-size bathroom displays including tile-drenched settings that show exactly how the technique looks in a real space. Our team can help you choose the right tile, match a grout, calculate quantities, and plan your layout. Free samples available.
lafabrico.com | 01392 848487 | Marsh Barton, Exeter EX2 8QX
